Friday, 10 June 2011

Final Evening Wear.

For my final project of year 1 of my fashion diploma I designed and created a two piece outfit....
I started by drawing out my design to get a visual concept....

I then made my design up in kaliko to show how I would make the final piece.... starting with patterns and cut outs... the trousers...
and the bra....

I then went on to create the patterns in kaliko... cutting out the trousers first...

then add the necessary cuts and hems in order to follow design....


 leaving the gaps where the chains will connect pieces together....


Adding uprurns to bottoms to give a polished look to trousers...


and waistband with hook and eye attachments....

The kaliko bra....


I decided not to add chains to the Kaliko toile of my two piece as it would be too time consuming to complete both.... so using my toile as a guideline I started to create my final piece....by making the bra up in a beautiful cream silk coupon......


I then lined it with the same material and started hand sewing bronze 3mm link chain to cover the bra.....stitching every 3 links....


this process was very time consuming and took an hour to do one strip of chain....

........

after the base of the bra was completely covered in chains I then added chain straps and drapes to complete the look....I also added a lining to hide the track marks of the hand stitching..... 

Over all the bra has 25 meters of chain on it.... I then went about completing my trousers, again in silk coupon using the same technique as the toile...

After making up trousers I then stared to add in the same bronze chains used in the bra....


Adding a kaliko lining to complete trousers and finish off look....


To go alongside my two piece I was asked to create a matching accessory... In the drawing of my design I have shown a chain mail cape... I set out making this....starting by creating the structure with chicken wire.....


I decided that using chains again in the cape would overcrowd it..... so instead I plaited up strips of kaliko and hand sewed them to structure....

I created to inside using the same technique also adding a central ring of straight material to show its the inside.....
 

To finish of the cape I added a central bronze buckle with silk attachments and selective chains to accessorize.....


 My evening wear two piece and accessory is no completed and I wanted to show my creations off by carrying out a styled photoshoot to show off and display...in my drawing I show the modeling wearing a bird cage on her head to go with the outfit..... I brought a cream bird cage and cut out the bottom grid with metal cutters....


these are the final outcomes from the edited photos of my final piece for my evening wear design......I call it Vintage Rust...........


Wednesday, 9 March 2011

My Fashion Illustration - Urban Textures!

I have earlier posted about fashion illustrations and showed you the artists that I admire, Holly Mae Gooch is one of my favourite. I have now been set a task to create my own fashion illustration adding the use of digital media and using the theme of urban textures....I started by taking some manual rubbings from urban/man made materials ......

I then starting thinking of my illustration and came up with the idea that I would create a photo shoot around the urban textures theme..... I started by sketching down some thoughts and ideas and came up with my final idea.... I wanted to project an PowerPoint presentation of
 urban textures onto a mass amount of draping material. I created a scene in which a beautiful model was leaning out of a high inner city window with her hooded cloak draping down from her to the floor and spread out in the aim of projecting onto it..... Having my final idea I set out bringing all the components needed to finalise the actual photo shoot......
 I chose an urban setting for my location, in Bristol inner-city Fire training tower ....


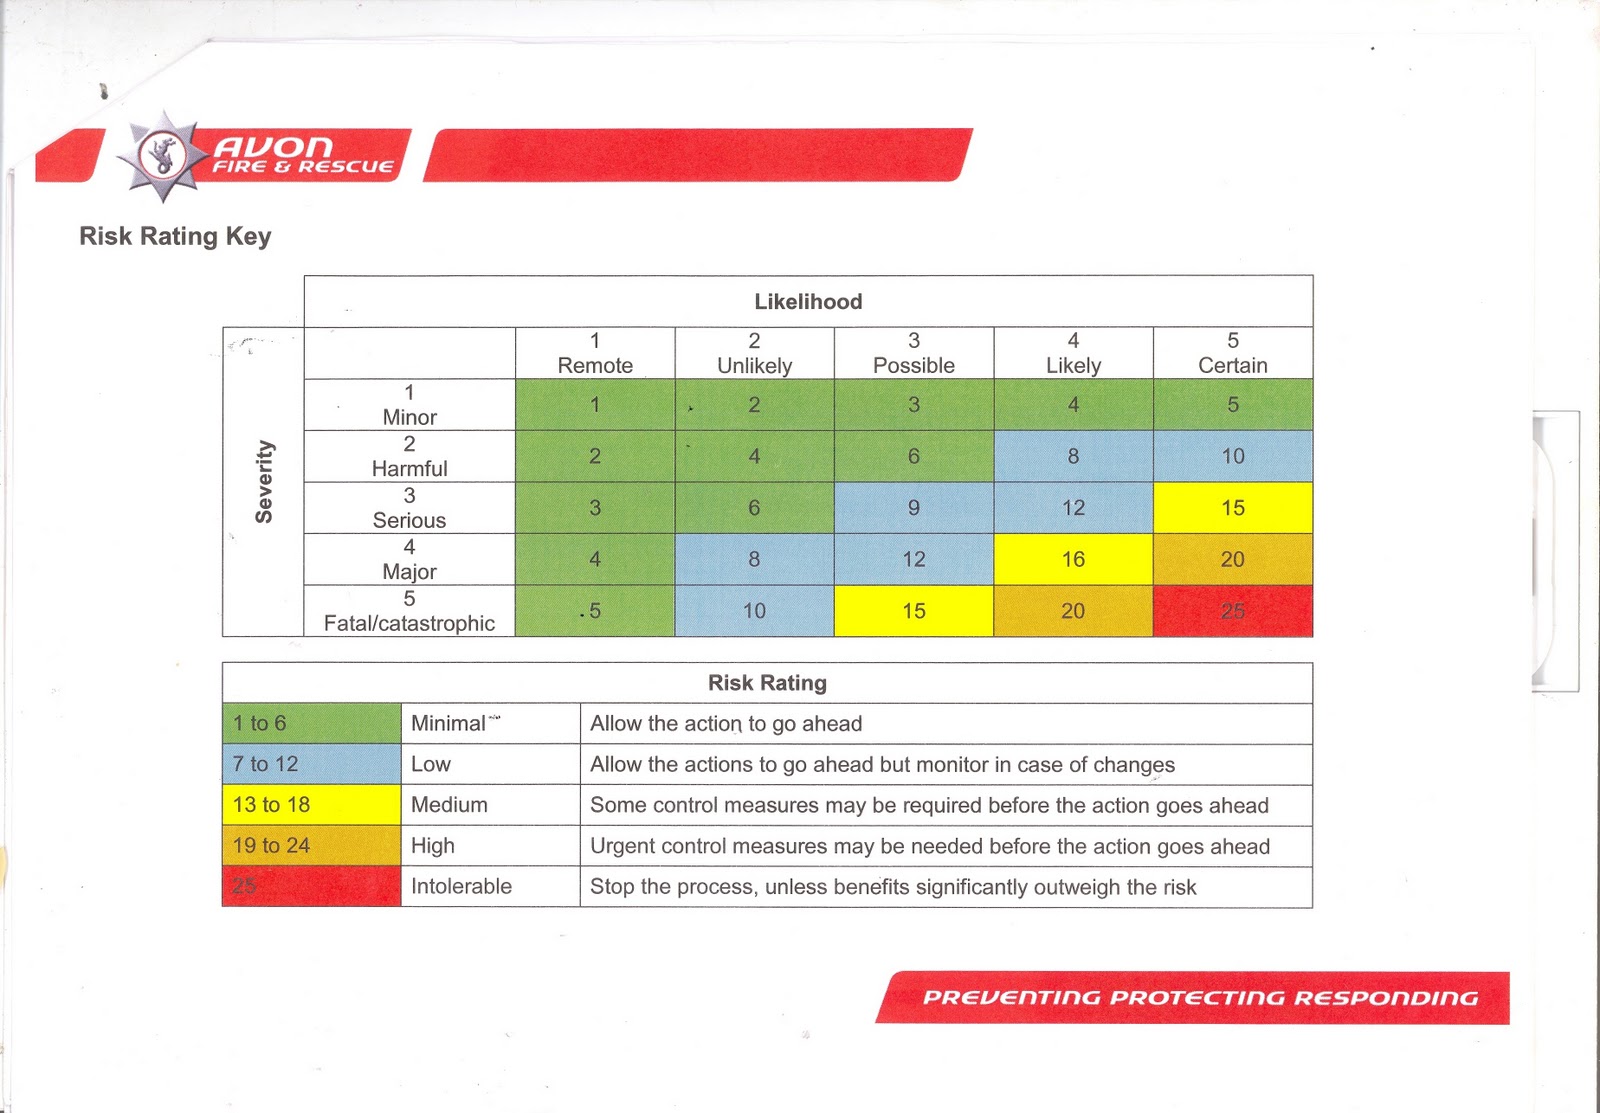
I had to get a number of permissions from the officials at the fire station as is is an active training tower.... a health and safety risk assessment was carried out on the tower specifically for this photo shoot so that everyone involved would be safe...especially the model who would be climbing ladders and harnessed to a safety rope from the inside......


I visualized the model being sat leaning out of one of the highest windows, innocent looking......Her long, draping, hooded cape falling from her to the floor....I knew that by creating my illustration on a large scale I would come across some obstacles.....the first Major one was finding the amount of material that I would need as I wanted it to be wide and long. Luckily I came across a whole roll of shiny, white, nylon material at the local scrap store and brought it for only £4..... I cut three pieces equally 30meters long and sewed in the side seams together to make the material 7meters wide... I added a hood and made a complementary dress for the model to wear over her harness......


I then went around Bristol taking photographs of urban textures to put into my PowerPoint presentation......


I then organised a professional photographer to attend the photo shoot and take the shots on the day of the photo shoot .... Stephen Tilley ( http://www.stephentilleyphotography.com/).....
I also arranged my sister to be the model so everything was organised for the actual day....
I designed the hair and make-up to complement the setting and theme of the shoot.... giving her tumbling, curly locks and bright, white and innocent looking make-up......


When we arrived on location I went up the tower to the third floor and placed my model position advising her on different poses and looks..... a firefighter fixed her into the harness and attached her to the building, he stayed hidden in the tower throughout the shoot... I then went back down to the ground with the photographer to direct the photo shoot.....
I then came across my 2nd major obstacle - the projection I created wouldn't show up during daylight onto my material.... I had to think on the spot, so I decided to carry on with the photo shoot then add extra urban textures into the final image using photoshop... the location was already an urban inner-city setting....so after the shoot Stephen and I sat down to photoshop to create the final images...
This picture is a long shot of the whole setting, I did this to show the scale of my illustration....the only thing I have changed on here is the colouring of the sky, it brings a dramatic effect to the image.....

Here I added buildings and cranes into the skyline of this photo to give more urban textures to the outcome... I also let the material blow up in the wind to create a swooping curve....

I got experimenting with photoshop and added different impacts of sky in the background.... I feel here I have created a 'repunzel' style outcome....

Again here I have only selected the model and the tower and put her in a scary looking wood and carries on with the 'repunzel' look.
I also had the whole day filmed to capture the organising and production of the day, I wanted to make a documentary of myself and how I work... I will be posting the edited version of this documentary on a later date.......
I actually think that my outcome was more effective without the projection onto the material as the whiteness and length is the feature and I feel that maybe this would be lost if the projection had covered up brightness of it....Overall I'm very pleased with the final images of my illustration and I can use the projection idea in another one of my photo shoots.


Tuesday, 15 February 2011

Kate Moss by Mario Testino Inspired Photoshoot!

I have just written an essay on similarities and differences between two fashion photographs.... I chose two pictures of Kate Moss, one by Mario Testino and One by Corrine Day..... at the end of my essay as part of the conclusion I created a photo shoot in the style of my favourite photographer of the two........I decided to go with Mario Testino and his book on Kate Moss, I used inspiration from his natural and spur of the moment shots......these are the outcomes from the photo shoot along side the pictures that gave me the inspiration.....


Friday, 21 January 2011

Art - Fashion Identity.

   After going to the Barbicain last week I decided to take a 2nd trip to London and visited the Royal Academy of Arts, the exhibition being held was called Art - Fashion  Identity, there was some really skills and interesting pieces of art through fashion being shown....

This is a dress creatively made by Susie MacMurray, September 2009, Widow.
The dress appears to be made out of material but after studying up close you realise that it has been carefully constructed with individual silver needles pierced through black under material, this creates a spectacular effect and makes it into a piece of art for me.


This constructed piece by Yohji Yamamoto caught my eye as I thought his use of wooden segments fixed together created a rigid structure yet allowed movement with the hinges.....

This is a Alexander McQueen lace couture, I thought this was beautiful and when looking closely it had obviously been made with a lot of skill and passion.
There was also some wigs and comtemporary forms of art being display, these three pieces especially stuck out to me ...