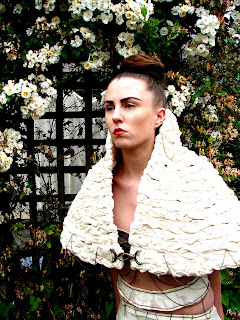
For my final project of year 1 of my fashion diploma I designed and created a two piece outfit....
I started by drawing out my design to get a visual concept....
I then made my design up in kaliko to show how I would make the final piece.... starting with patterns and cut outs... the trousers...
and the bra....
I then went on to create the patterns in kaliko... cutting out the trousers first...
then add the necessary cuts and hems in order to follow design....
leaving the gaps where the chains will connect pieces together....
Adding uprurns to bottoms to give a polished look to trousers...
and waistband with hook and eye attachments....
The kaliko bra....
I decided not to add chains to the Kaliko toile of my two piece as it would be too time consuming to complete both.... so using my toile as a guideline I started to create my final piece....by making the bra up in a beautiful cream silk coupon......
I then lined it with the same material and started hand sewing bronze 3mm link chain to cover the bra.....stitching every 3 links....
this process was very time consuming and took an hour to do one strip of chain....
........
after the base of the bra was completely covered in chains I then added chain straps and drapes to complete the look....I also added a lining to hide the track marks of the hand stitching.....
Over all the bra has 25 meters of chain on it.... I then went about completing my trousers, again in silk coupon using the same technique as the toile...
After making up trousers I then stared to add in the same bronze chains used in the bra....
Adding a kaliko lining to complete trousers and finish off look....
To go alongside my two piece I was asked to create a matching accessory... In the drawing of my design I have shown a chain mail cape... I set out making this....starting by creating the structure with chicken wire.....
I decided that using chains again in the cape would overcrowd it..... so instead I plaited up strips of kaliko and hand sewed them to structure....
I created to inside using the same technique also adding a central ring of straight material to show its the inside.....
To finish of the cape I added a central bronze buckle with silk attachments and selective chains to accessorize.....
My evening wear two piece and accessory is no completed and I wanted to show my creations off by carrying out a styled photoshoot to show off and display...in my drawing I show the modeling wearing a bird cage on her head to go with the outfit..... I brought a cream bird cage and cut out the bottom grid with metal cutters....
these are the final outcomes from the edited photos of my final piece for my evening wear design......I call it Vintage Rust...........


